jueves, 11 de junio de 2020

Have a happy summer!

Hi everyone!

Welcome to the last project we are going to do this course! It was great to see all your projects, we are very proud of you effort!

In this last task we are going to learn how to draw soap bubbles! Take a look:


How could we even try to draw something so complex?? It's easier than it seems! Look:


Bubbles:
1. are circular
2. are transparent
3. have color rings.
4. have highlights in the inside
5. are brighter in the outside and darker in the inside

To make this wonderful drawing, you will need:

1. A dark paper or cardboard.
2. Crayons, color pencils or chalk.

STEPS:

1. We draw a circle and make details in white as in this photo:


2. We add different gradients of different colors:


3. We add some glares and final details:


Finally, you have this video, in which you can see the process:


Have a wonderful summer and remember to do a lot of crafts!

Sergio and Lucia.

viernes, 5 de junio de 2020

Drawing like Pablo Picasso

Hi everyone!

This week we will become famous abstract painters, just like Pablo Picasso.

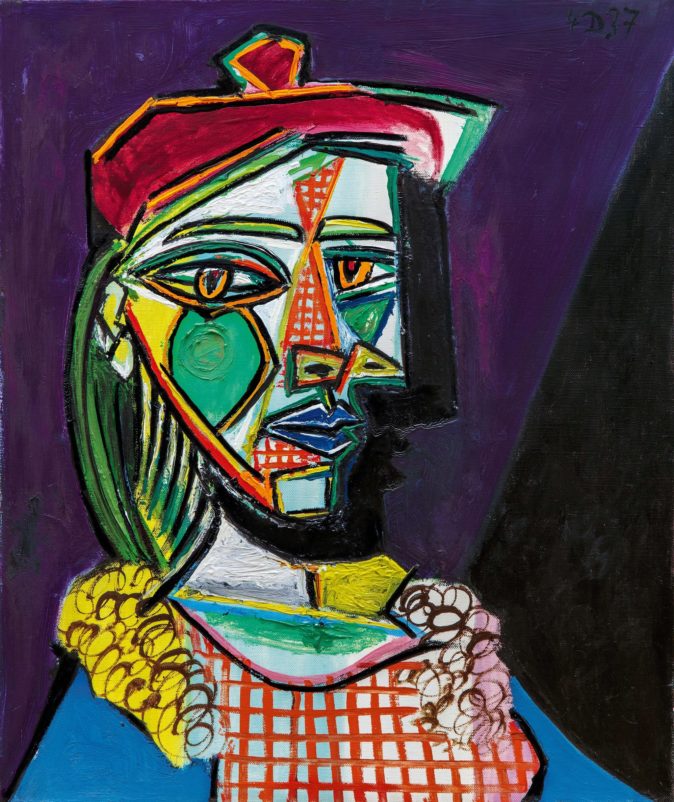
Picasso was a painter from Málaga (Andalucía) who also lived in A Coruña and other cities of the world. He is known for using a painting style called "cubism".

Cubism consist in drawing a picture or a portrait from different perspectives at the same time, so the faces seem to be "broken" or "distorted".

He also used very strong colors, as you can see in these examples:


For this week's project you will need:

- Paper.
- Crayons or wax crayons.

Now, watch this tutorial about how to draw like Picasso and try to do your own painting!


Best regards,
Sergio and Lucía.

jueves, 28 de mayo de 2020

New origami projects!

Hi everyone!

Today we are pleased to show you two different origami figures. Do you remember the butterflies we made some weeks ago?

You can choose wich one of these two figures you prefer to do, or even do both if you feel inspired enough!

To do so you only need A SQUARE OF PAPER OF THE SIZE YOU PREFER, but it's better if you do it with a large square of paper.

Also, it looks prettier if you use a colored paper or if you decorate it once you have finished.

FIRST FIGURE: ORIGAMI RABBIT


SECOND FIGURE: ORIGAMI DINOSAUR


Remember to STOP THE VIDEO IN EVERY STEP, SO YOU DON'T GET LOST.

Enjoy!!

jueves, 21 de mayo de 2020

A city skyline with chalk

Hello there!

Today we bring you a new task that can result as amazing as this:

chalk skyline. (no instructions, just photo) create a skyline ...


To create this spectacular skyline you will need:

- Dark color card stock (dark blue, black, gray ...)
If you do not have card stock, you can use the inside of a cereal box, for example.

- Chalks of various colors. It could be done with white chalk, but it doesn't look that good.

- Scissors.

- A pencil.

The process is as it follows:

1. We draw the outline of the city with a pencil on card stock. We cut it.


2. We paint with chalk the top and sides of all buildings.


3. We place the template on top of the black card stock and begin to spread the chalk with our fingers.


4. We place the template on various parts of the card stock and repeat the previous step.


5. We add the windows of the buildings and the stars with a white chalk.


You can be creative and create other designs, like this landscape:


We hope to see your creations soon!
Sergio and Lucia.

Pictures from Maureen L. White.

jueves, 14 de mayo de 2020

Crafting a 3D cube

Hello everyone!

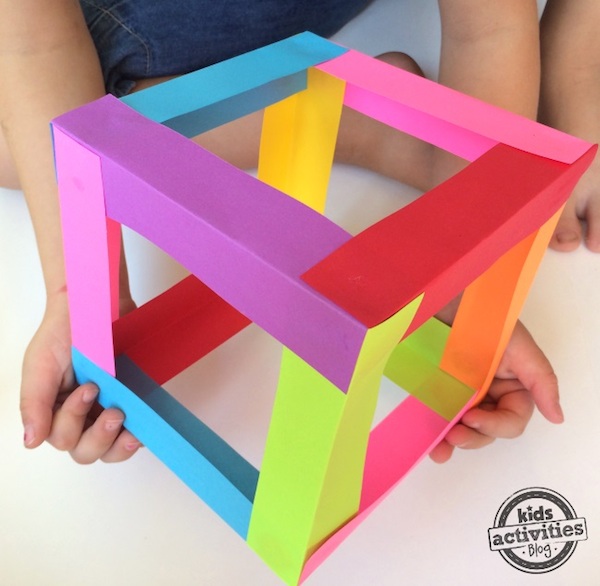
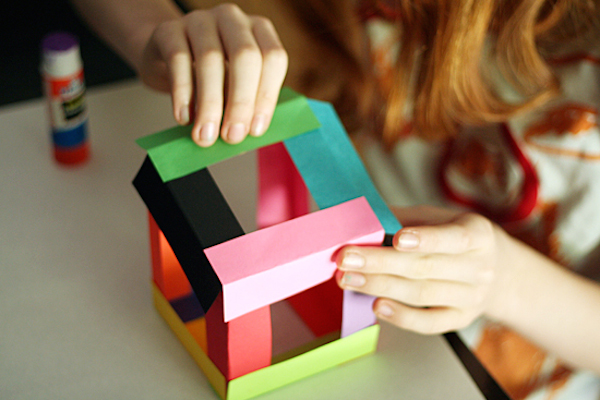
Today we propose you a very simple craft: build a cube using colored cardboard. The result is this:

Manualidades con papel


To make this craft we need:
- Cardboard or colored paper.
- Scissors.
- Glue.

Optionally:
- Crayons, markers and other materials to decorate.


Steps:

1. We cut twelve strips of cardboard of different colors OF THE SAME SIZE EXACTLY. You can choose the size, but remember that the strips must be rectangular.

2. If you already have the colored strips cut out, fold the strips at a right angle (90º).

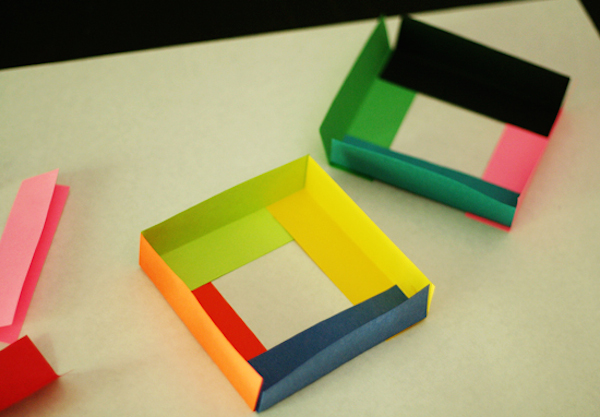
3. We begin to mount the base of our cube, placing the strips one on top of the other. It has to look like this:

Manualidades infantiles con papel

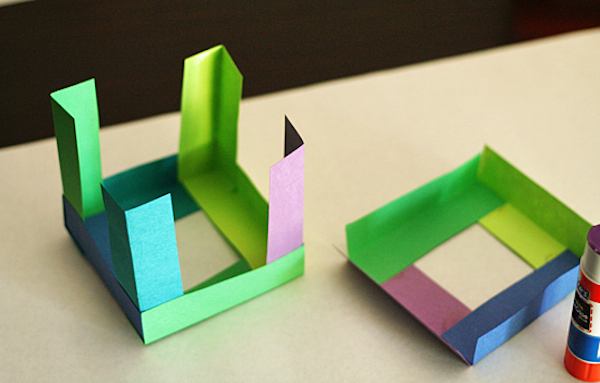
4. We place the strips forming columns above the vertices of the base that we have just made:

Cubos de papel

5. We create another base equal to that of step 3 and paste it on the columns we just made:

Manualidades con papel

You have already finished your cube! You can create several cubes of different sizes and colors and decorate them as you want.

Font: www.pequeocio.com

Best regards,
Sergio and Lucía.

jueves, 7 de mayo de 2020

A collage with recicled materials

Hello everyone!

This week we propose a new task with which you can be very creative: a collage.

What is a collage? A collage is an artistic technique that involves using pieces of colored paper to create a composition.

With this technique we can create as amazing results as these examples:


To make your own collage, you will need these MATERIALS:

- Old magazines, newspapers or supermarket brochures.
- Optionally, colored paper.
- A glue stick.
- Scissors.
- A good idea :)

The procedure is this:

1. We think about the theme of our collage. It could be an animal, a landscape, a portrait... It's up to you and your imagination!


2. We cut with scissors or with our hands all the bits of the paper that we need from the magazine or newspaper.


3. We place them on the paper or cardboard where we will compose our collage.


4. When we are happy with the design, we paste them. And that's it!


Retrato con papelitos tipo mosaico | Arte elemental, Niños ...


We hope you try this activity and show your results to us!

Best regards,
Sergio and Lucia.

jueves, 30 de abril de 2020

Page-eater bookmark!

Hello everyone!

Do you like to read? What is your favorite type of book? Mine are comics.

Today we are going to learn how to make a special bookmark to indicate the page you are reading in your favorite book.

It is very easy to do and you can make it totally unique!

NECESSARY MATERIALS:
- A rule.
- Paper or cardboard (better if it is colored).
- Glue.
- Scissors.
- Crayons, colored pencils or markers.
- Other optional decorations.

FIRST STEP: We draw three squares (6.5 cm on each side) on the paper forming an "L", as in this photo:

Marcapáginas: paso 1

SECOND STEP: We draw a line that crosses two of the squares as in this photo. We cut off the gray painted part.

Marcapáginas: paso 2
Marcapáginas: paso 3

THIRD STEP: We cut out a square (6.5 cm on each side) of another color.

Marcapáginas: paso 5

FOURTH STEP: We glue the square of another color on the figure we had before. We fold the two "ears" of our figure and glue them together.

Marcapáginas: paso 6

Marcapáginas: paso 7

FIFTH STEP: We decorate it freely. And it is finished!

Marcapáginas: resultado


If you make this funny bookmark, please, send us your photos.

Greetings from Sergio and Lucia!

jueves, 23 de abril de 2020

Spring craft: origami butterflies

Hello everyone!

We are very happy with the photos you sent us from last week's drawing! We hope to continue receiving more!

This week we present you a spring activity: how to make an origami butterfly.

To make this craft you only need sheets of paper (better if they are colored). If you don't have colored papers, you can decorate your butterflies with markers or crayons.

It's not a difficult craft, but you need to pay close attention to all the steps in the following video:


If you make several butterflies, you can hang them on a lamp or stick them on the wall:


If you try this craft, please, send us some photos with the results!


viernes, 17 de abril de 2020

Good morning, everyone!

This week we present to you a task that has to do with the quarantine that we are living.


Remember to write "We stay at home!" instead of "Ficamos na casa".

The artist Leandro Lamas shows us how to elaborate on a sheet of paper a drawing that represents our neighborhood.


In each window we can draw a person doing a different action: a hobby, a job, singing, dancing ...


You can do this task using a pencil, a pen, felt tips, crayons, or any other material you have at home!

We would love to see your creations, so when you finish them, send it to our e-mail adress (Sergio's or Lucia's).


lunes, 13 de abril de 2020

Welcome to the Arts and Crafts blog!

Hi everyone! 

We are Sergio and Lucia, your Tarrio Arts and Crafts teachers.

In this blog we are going to publish new peojects and crafts to keep you entertained during this quaratine. We hope you have fun with your family with the ideas we are going to post every week.

We would like to hear from you in the comments section or through e-mail.

Our e-mail accounts are:

sergio.carbon@ceiptarrio.net

luciapicos@ceiptarrio.net